Does your WordPress menu look dull and uninspiring? Without the right visual elements, even the most beautifully designed websites can struggle to hold attention. Navigating your site should be a seamless and engaging experience for visitors, not a chore.
The good news is that adding icons to your WordPress menu can instantly enhance your site’s appeal and user experience.
In this article, we’ll walk you through the simple steps to add icons in a WordPress menu, making your website more attractive, user-friendly, and professional.
Method 1: Adding Menu Icons with Custom Code
If you prefer a code-based approach, follow these steps to add icons to your WordPress menu:
- Add Custom Fields to Menu Items
- By default, WordPress does not have a built-in option to add icons to menu items. To achieve this, we’ll use the “CSS Classes” option.
- Go to your WordPress dashboard and navigate to “Appearance” > “Menus.”
- In the top-right corner, click on “Screen Options” and check the “CSS Classes” box to enable it.
- Add a Custom CSS Class to Each Menu Item
- For each menu item, add a unique CSS class under the “CSS Classes” field (e.g.,
menu-icon-home,menu-icon-about).
- For each menu item, add a unique CSS class under the “CSS Classes” field (e.g.,
- Add Custom CSS to Display Icons
- Next, you need to add some custom CSS to display the icons. You can add the CSS in “Appearance” > “Customize” > “Additional CSS” or in your theme’s
style.css
- Next, you need to add some custom CSS to display the icons. You can add the CSS in “Appearance” > “Customize” > “Additional CSS” or in your theme’s
.menu-icon-home::before {
    content: '\f015'; /* Example Unicode for a Font Awesome icon */
    font-family: 'FontAwesome';
    margin-right: 8px;
}

.menu-icon-about::before {
    content: '\f129'; /* Example Unicode for a different Font Awesome icon */
    font-family: 'FontAwesome';
    margin-right: 8px;
}
- In this example, Font Awesome is being used for icons. You’ll need to include the Font Awesome library in your theme by adding the following code to your
functions.php
function enqueue_font_awesome() {
    wp_enqueue_style( 'font-awesome', 'https://cdnjs.cloudflare.com/ajax/libs/font-awesome/6.0.0-beta3/css/all.min.css' );
}
add_action( 'wp_enqueue_scripts', 'enqueue_font_awesome' );
- You can change the Unicode in the CSS to different icons from the Font Awesome library.
- Customize Icon Styles
- You can further style the icons, such as changing the color, size, or spacing using CSS.
Method 2: Adding Menu Icons with the Easy Menu Icons Plugin
If coding isn’t your preferred method, the “Easy Menu Icons” plugin provides a simple and intuitive way to add icons to your menus.
- Install the Easy Menu Icons Plugin
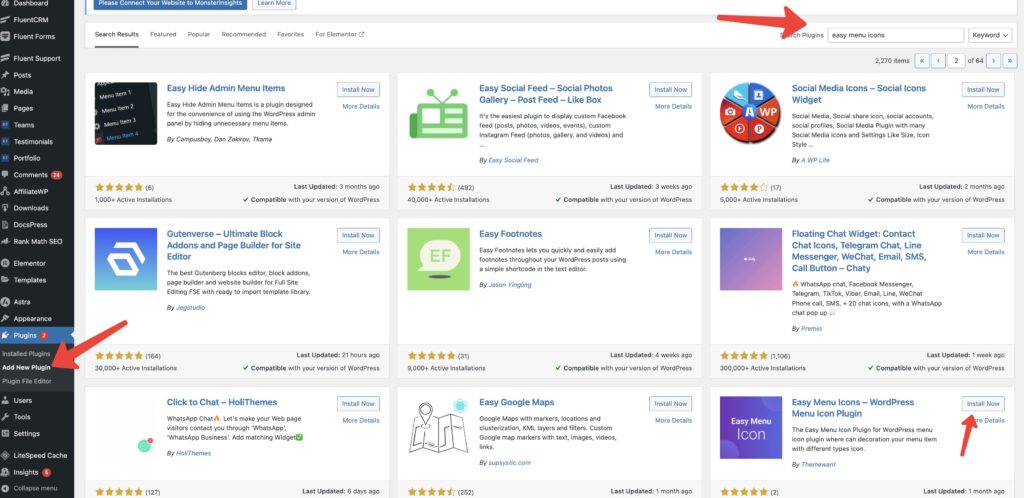
- Navigate to “Plugins” > “Add New” in the WordPress dashboard.
- Search for “Easy Menu Icons” and install it.
- Activate the plugin.

- Add Icons to Menu Items
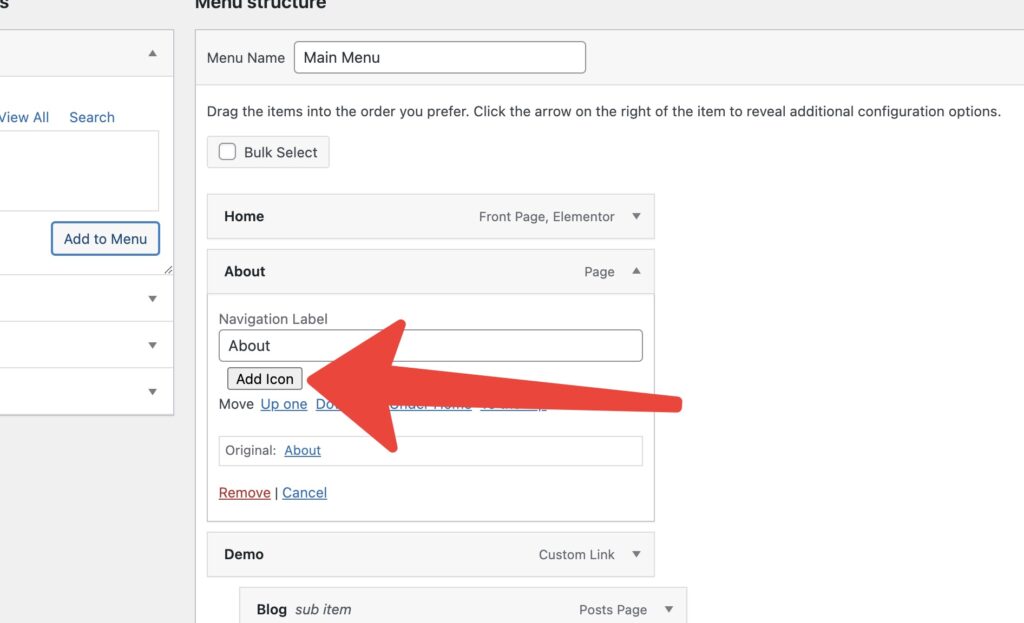
- Go to “Appearance” > “Menus” and edit your menu.
- For each menu item, you’ll find an option to add an icon.

- The free version supports Dashicons, while the premium version includes more than 8 different types of icon fonts and allows adding custom images like SVG, PNG, and JPG.
- Save Your Menu
- Once you’ve added the icons, click “Save Menu” to update your website.
- Process to add Menu Icon
Which Method Should You Use?
Both methods are effective for adding icons to your WordPress menu, but choosing the right one depends on your needs:
- Custom Code Method: Ideal for developers who prefer to have full control over the code and don’t mind tweaking some CSS and PHP.
- Easy Menu Icons Plugin: Best for users who want a quick and easy solution without dealing with code.
Conclusion
Adding icons to your WordPress menu can enhance your site’s navigation and make it more visually appealing. Whether you prefer using custom code or a plugin like Easy Menu Icons, both methods can achieve great results. Choose the one that best suits your level of expertise and needs.


